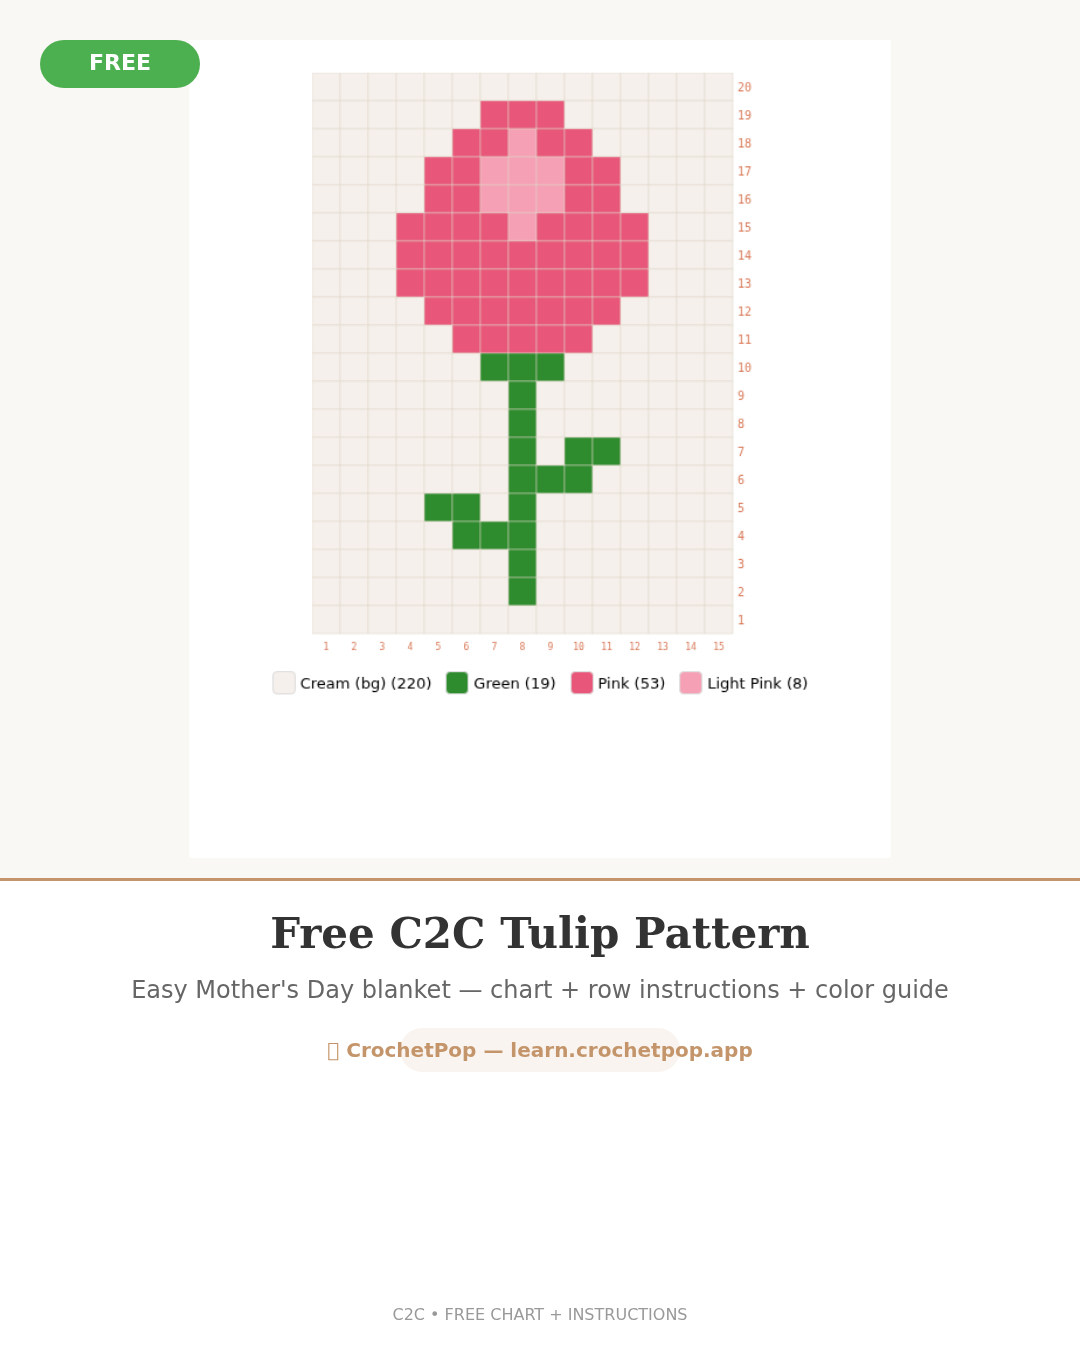
Free C2C Tulip Pattern — Beginner-Friendly Step-by-Step
This corner-to-corner (C2C) tulip is one of the simplest motifs to crochet — beginners can finish the 15×20 block panel in about three hours. The pattern is fully free, with a row-by-row chart and a Live Row Tracker so you never lose your place. Use it as a wall hanging, pillow-front panel, tote-bag accent, or as the centerpiece of a larger baby blanket layout.
Open the Tulip C2C Pattern + Live Row Tracker →
Full chart · row-by-row instructions · color guide · PDF export · free
What is C2C crochet?
C2C (corner-to-corner) builds a diagonal grid of small DC clusters instead of horizontal rows. You start from the bottom-right corner with a single block, increase by one block each diagonal row until you hit the midpoint, then decrease back down to a single block in the top-left corner. The result looks like a regular pixel grid but is worked on the diagonal — which means color changes happen very often (every row), but each individual row is short.
Each C2C block = ch 3 + 3 dc worked into a ch-3 loop. This tulip is laid out on a 15-block wide × 20-block tall grid (300 blocks total — flower silhouette only, no background frame baked in). At worsted-weight C2C gauge of 1.25 blocks per inch (5 blocks per 4 inches, per the CrochetPop gauge table), the bare motif works up at roughly 12 × 16 inches on a 5 mm hook — the right size for a small wall hanging, a pillow front, or a tote-bag panel. To turn it into a full baby blanket (30 × 36 inches), add background blocks around the motif using the Blanket Designer.
New to C2C? Read the filet crochet guide for background on grid-based crochet conventions — many of the chart-reading rules overlap.
Materials
- Yarn: worsted weight (CYC 4), approximately 60 yards total for the bare 15×20 motif — roughly 11 yards pink (tulip body), 2 yards light pink (center highlight), 4 yards green (stem and leaves), plus ~45 yards of background color if you fill the surrounding cells. Numbers are derived from the actual cell counts × 3 dc per block × 0.055 yd/dc × 1.2 buffer.
- Hook: 5 mm (US H-8) — or the size that gives you a firm, even fabric
- Colors (3 for the motif itself): green (stem + leaves), medium pink (tulip body), light pink (center highlight). Add a background color (cream, white, or any pale neutral) if you are framing the flower in a larger blanket layout.
- Notions: yarn needle for weaving ends, stitch markers optional
Tip: use a free pattern generator to calculate exact yardage once you decide on your finished size — the estimator adjusts per-color based on which cells each color occupies.
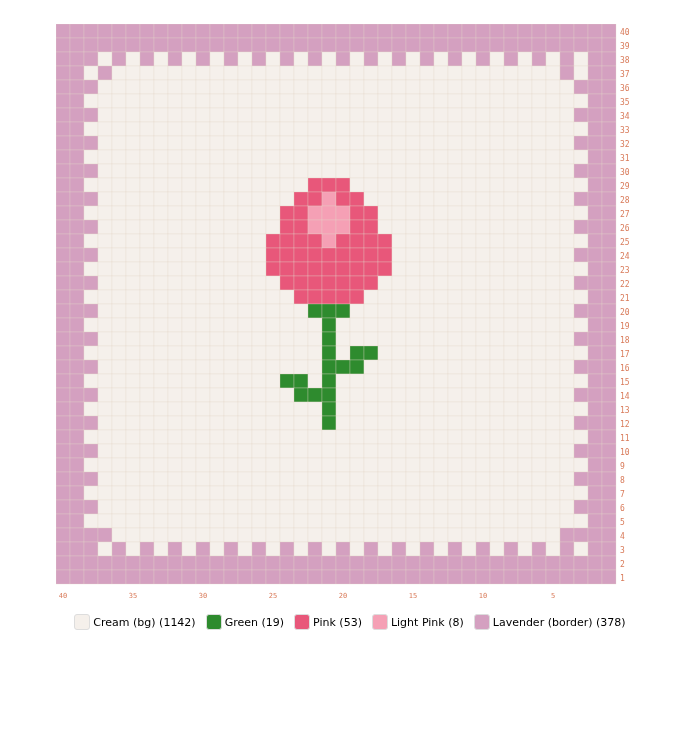
The Chart
Read the chart starting from the bottom-right corner, moving diagonally up-left. Each small square in the grid = one C2C block (ch 3 + 3 dc cluster). The tulip bloom sits in the upper half of the grid, with the stem rising from the midpoint and two leaves branching left and right.
The full interactive chart, with diagonal row numbers labeled and direction arrows, lives on the pattern page. The chart updates if you change yarn weight or finished size.
How to follow this pattern row by row
C2C rows alternate direction — the first diagonal row (bottom-right to upper-left) reads right-to-left; the next row reads left-to-right; and so on. Each row is one block taller and one block wider than the previous until the midpoint, then it's one block shorter each time.
- Foundation corner: Ch 6. Dc in 4th, 5th, 6th chain from hook (= 1 block). This is your starting corner.
- Increase rows: Turn, ch 6, dc in 4th–6th ch (1 new block started), then join into the ch-3 loop of the previous block with a sl st, ch 3, 3 dc in that loop (1 block added per previous block). Continue across the row.
- At the midpoint: The grid is 15 wide × 20 tall, so it is taller than it is wide. You will stop increasing on one axis before the other — keep increasing on the long edge until you reach 20 diagonal rows on that side, then begin decreasing. The Live Row Tracker labels every diagonal row so you do not have to count by hand.
- Finishing corner: When you reach a single block again, fasten off and weave in ends by color group.
Color changes: drop the old color at the last "yo, pull through" of the last dc in the current block. Pick up the new color for the ch-3 that starts the next block. To keep the back tidy, carry rarely-used colors along the edge rather than cutting and rejoining — the light pink highlight (only ~2 yards / 8 cells) can be carried up the height of the bloom rather than cut.
Using the Live Row Tracker
C2C is one of the hardest pattern types to track by hand — the diagonal rows are short near the corners and long near the middle, and it's easy to lose count mid-row. The Live Row Tracker solves this: it highlights the current diagonal row, shows you which blocks are which color, and auto-saves your place whenever you mark a row done.
To use it: open the Tulip C2C pattern, then click the orange Open Live Row Tracker button. The tracker opens with every diagonal row of the 15×20 motif pre-loaded. Tap Row done after each diagonal row; tap Undo if you marked one early. Close the tab and come back — the tracker remembers exactly where you stopped. No signup required.
For more on what the tracker can do — including how to track patterns from external sources — read Live Row Tracker — Never Lose Your Place in a Crochet Pattern.
What you can make with this panel
- Wall hanging — slip a wooden dowel through the top loops before the last join, add a length of twine
- Pillow cover — crochet two matching panels, seam three sides, insert pillow form, seam the fourth
- Baby blanket centerpiece — drop the motif into the Blanket Designer's center-1×1 layout on a baby (30 × 36 inch) size, then add a 2-round single-crochet border
- Tote bag panel — sew onto the front of a canvas tote with a whip stitch around the perimeter
- Framed fiber art — stretch and pin to a foam board; frame or hang unframed
Color ideas to try
The same three-color chart reads differently with different yarn choices. These are ideas to try rather than tested swatches — preview each in the Design Studio before buying yarn, since the way two yarns sit next to each other in fabric is not always predictable from a screen palette:
- Spring pastels — pale pink bloom, light pink highlight, sage green stem.
- Bold garden — deep magenta bloom, blush highlight, chartreuse stem.
- Monochrome — three shades of grey, with one shade slightly warmer than the others for the bloom.
Open the Design Studio, load the tulip grid, and swap colors — the chart updates live. You can also export a PDF with the new color guide.
Seasonal gift idea
Looking for a quick spring gift? This pattern finishes fast enough to be a same-week project. A pastel pink + sage green + pale yellow version is particularly popular for Mother's Day, birthdays, or a housewarming. Tag #crochetpop if you make one for someone special.
More free C2C and grid patterns
- Free C2C Rose pattern — a 17×20 rose motif with layered petal detail, 4 colors
- Free C2C Sunflower pattern — bright yellow with a brown center, 3 colors
- Best free crochet pattern generators 2026 — side-by-side comparison of 5 tools including CrochetPop
- Photo to crochet pattern — turn any image into a C2C, SC pixel, or granny pixel chart
- Live Row Tracker — track any pattern, including ones from external sources