How to Turn a Photo Into a Crochet Pattern — Complete Guide
It is genuinely possible to take a photo on your phone — your dog napping on the rug, a child's marker drawing, a beach sunset, your grandmother's wedding portrait — and end up with a crochet chart that you can actually follow stitch by stitch. The tools exist, most are free, and the best ones run entirely in your browser without uploading anything to a server. Done well, the finished blanket or wall hanging genuinely looks like the photo, not like a vague pixel-art approximation.
Done badly, of course, you get a muddy grid that no one recognises and 80 hours of work that hits the donation bin. This guide is the long version of the short answer. It walks through the three real ways to convert a photo to a chart, the five crochet techniques that handle photo-style colourwork, the step-by-step CrochetPop flow, how to choose a photo that will actually work, how many colours to pick, roughly how much yarn you will need, and the mistakes that send projects to the frog pond.
You will need three things: a photo (any format — JPEG, PNG, HEIC, even a screenshot), yarn in the colours you want to use, and a hook that matches your yarn. No subscription, no app install, no signup. By the end of the guide you will have a chart in front of you and a row tracker open on your phone.
What you will need
- A photo — phone photos are fine. 1000 × 1000 pixels or larger gives the best results.
- Yarn — 3 to 12 colours depending on the technique you pick. Worsted (medium / 4) is the most forgiving.
- A hook that matches your yarn weight — 5.0mm (US H/8) for worsted is the standard.
- Stitch markers and a way to count rows. We recommend the free CrochetPop Live Row Tracker — open on your phone, tap to mark progress.
Three ways to turn a photo into a crochet chart
There is no single right way. Each has a real cost in time, money, or control. Pick based on how much of the process you actually enjoy.
Method 1: Hand-graph it yourself on grid paper
Print a piece of square grid paper, hold the photo next to it, and colour in each cell. For a 60 × 60 chart that is 3,600 cells. Even working quickly, that takes 3 to 10 hours of focused time. You will also need a way to reduce the photo's colour palette by eye — squinting at the screen is genuinely how most people do this.
Best for: people who genuinely enjoy the puzzle, art-school types, anyone doing a one-off keepsake where the design process is part of the gift. Worst for: anyone who wants to start crocheting tonight.
Tip: even if you don't graph the whole thing by hand, draw a 10 × 10 corner manually first. It teaches you how the chart-to-fabric conversion really feels, and it makes the software output much less mysterious.
Method 2: Free online tools (recommended for most people)
Three browser-based tools dominate the free photo-to-chart space in 2026. We tested all of them in our comparison listicle — here is the honest one-line summary of each.
| Tool | Best for | Speed | Cost |
|---|---|---|---|
| CrochetPop (this site) | Photo → C2C or SC pixel chart with a built-in row tracker. Mobile-first. | Under 30 seconds from upload to chart | Free, no signup |
| Stitch Fiddle | Detailed colour-by-colour control. Best for experienced designers. | 5 to 15 minutes once you learn the UI | Free tier, paid Premium for advanced features |
| Pixa Pattern Designer | Offline support, mobile-native stitch counter, multi-language. | 2 to 5 minutes | Free with optional paid features |
We make CrochetPop, so factor that into the comparison. The honest reason it lands at the top of this list for photo-to-chart: it is the only one of the three that lets you tap the subject to lift it off its background, simplifies the fiddly noise while keeping key features like eyes, suggests a technique based on the image content, and opens a Live Row Tracker on the same page when you are ready to crochet. Stitch Fiddle is more powerful for fine-grained editing once you know what you are doing. Pixa is the best of the three for pure offline mobile use.
Try CrochetPop's photo-to-chart flow →Method 3: Hire a custom Etsy designer
If you genuinely do not want to touch the design step at all, Etsy has dozens of designers who will hand-graph a photo into a chart for you. Typical pricing runs from $14 (a simple silhouette filet chart) up to $78+ (a full-colour C2C with written row-by-row instructions). Turnaround is usually 1 to 4 weeks because the designer is, in practice, doing Method 1 on your behalf.
Best for: a milestone gift where you want to crochet but absolutely do not want to design. A friend's wedding portrait, a beloved pet who has passed, a baby's first photo. The designer takes the design risk off you — you get a chart you can trust.
Worst for: anyone iterating on multiple designs or anyone on a deadline shorter than three weeks. At the volume of "I want to make ten of these," the per-chart cost adds up fast.
Pick the right technique
Five crochet techniques can turn a colour grid into fabric. They are not interchangeable — each produces a recognisably different look, takes a different amount of time, and handles a different range of colour counts. Pick the technique first, then the photo workflow becomes much simpler.
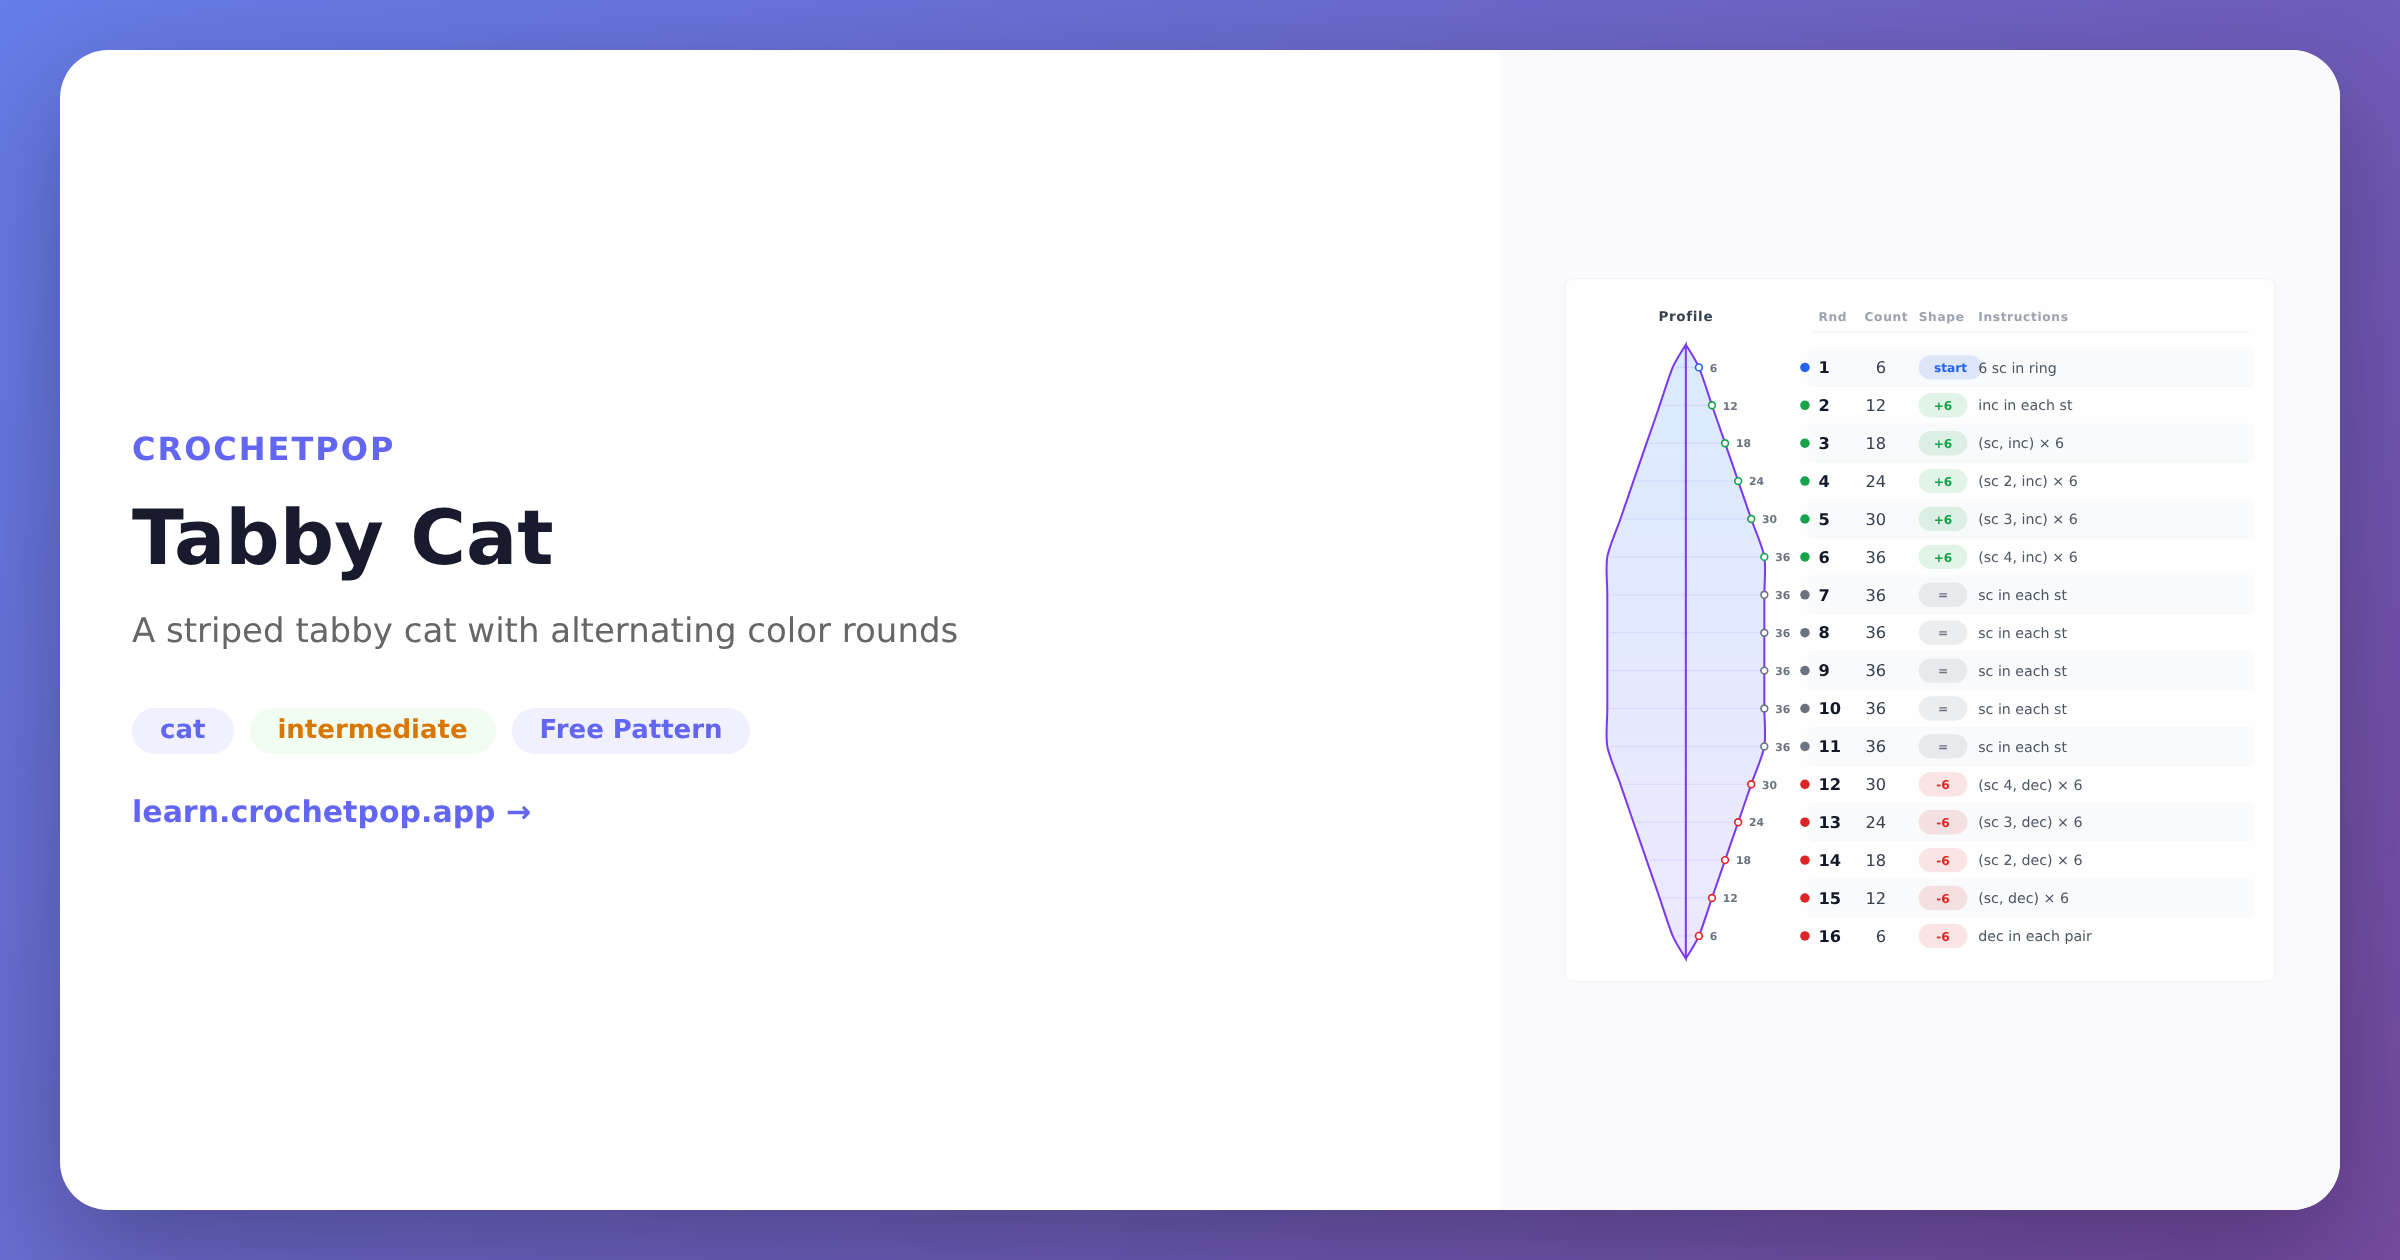
SC pixel (single crochet pixel)
Each cell in the chart is one single crochet stitch. SC has a 1:1 aspect ratio (height ≈ width), so the chart and the finished fabric are visually identical — what you see is what you get. Best for highly detailed portraits, text, and any design where you want pixel-perfect accuracy.
Difficulty: Beginner-friendly. Slow to crochet (sc is short, so a 60 × 60 piece is 3,600 stitches), but the technique itself is just sc with colour changes.
Best for: 4 to 12 colours, photo-realistic portraits, name signs, anything detailed.
C2C (corner-to-corner)
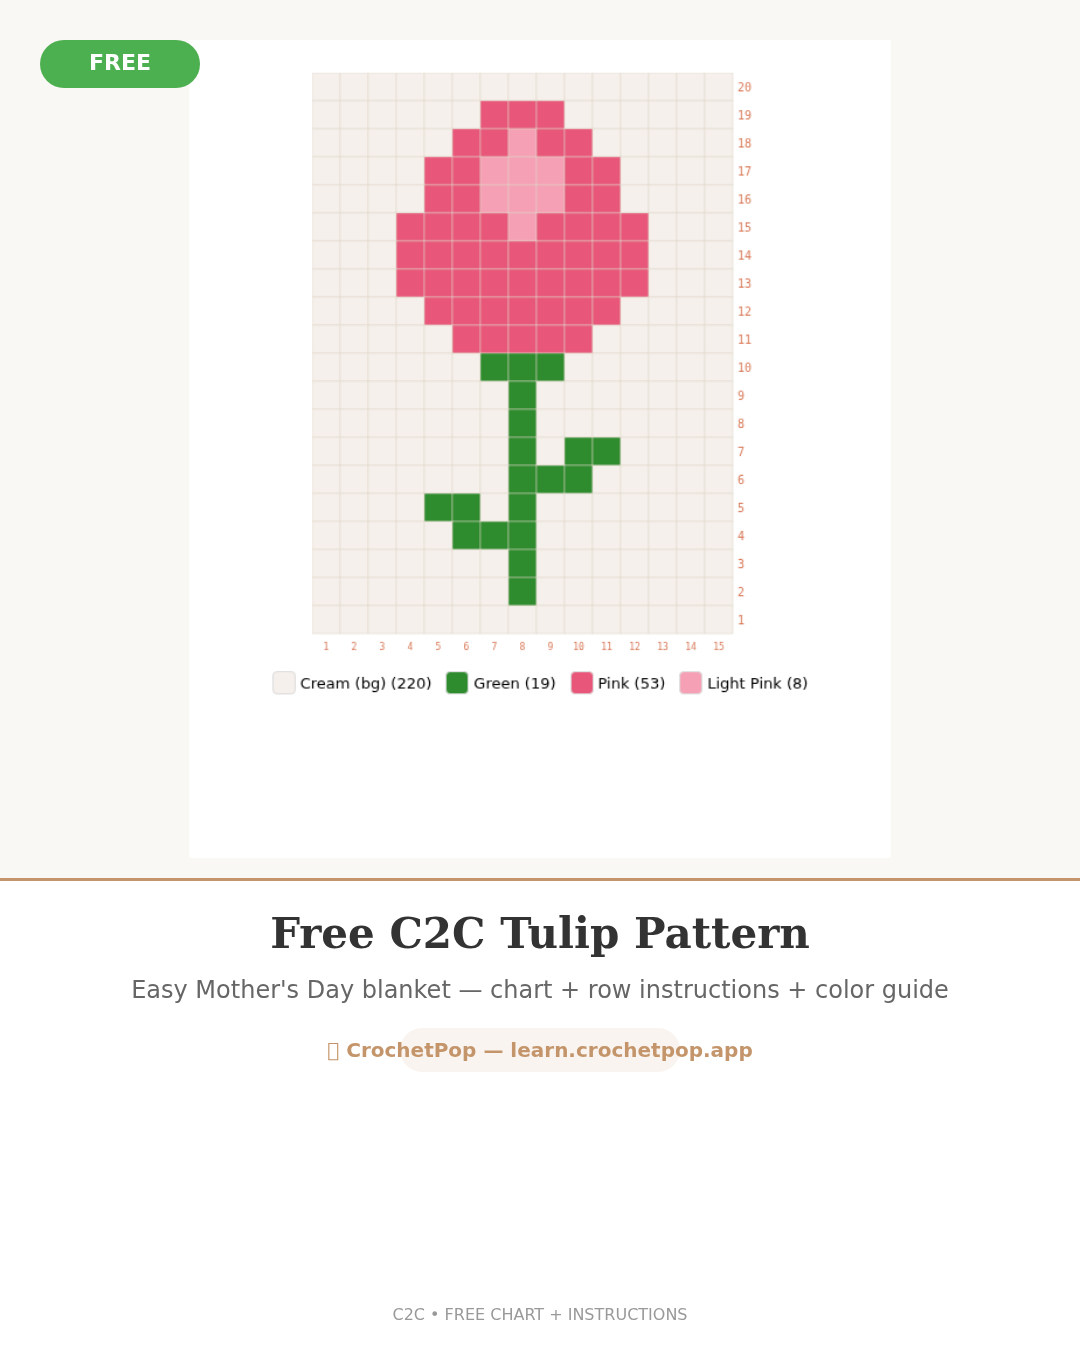
Each cell is a small block of 3 dc + ch 3 worked on the diagonal, starting from one corner of the blanket and growing diagonally out to the opposite corner. The fabric is square once finished, but the chart is read along diagonals. C2C blocks are square cells — you can think of them as DC-based pixels that happen to be worked on the bias.
Difficulty: Beginner-friendly once the corner-to-corner motion clicks (usually after row 5). Much faster than SC pixel — a 60 × 60 C2C blanket has 3,600 blocks instead of 14,400 sc stitches.
Best for: 3 to 8 colours, pet portraits, hearts, characters, anything you want done in under 40 hours.
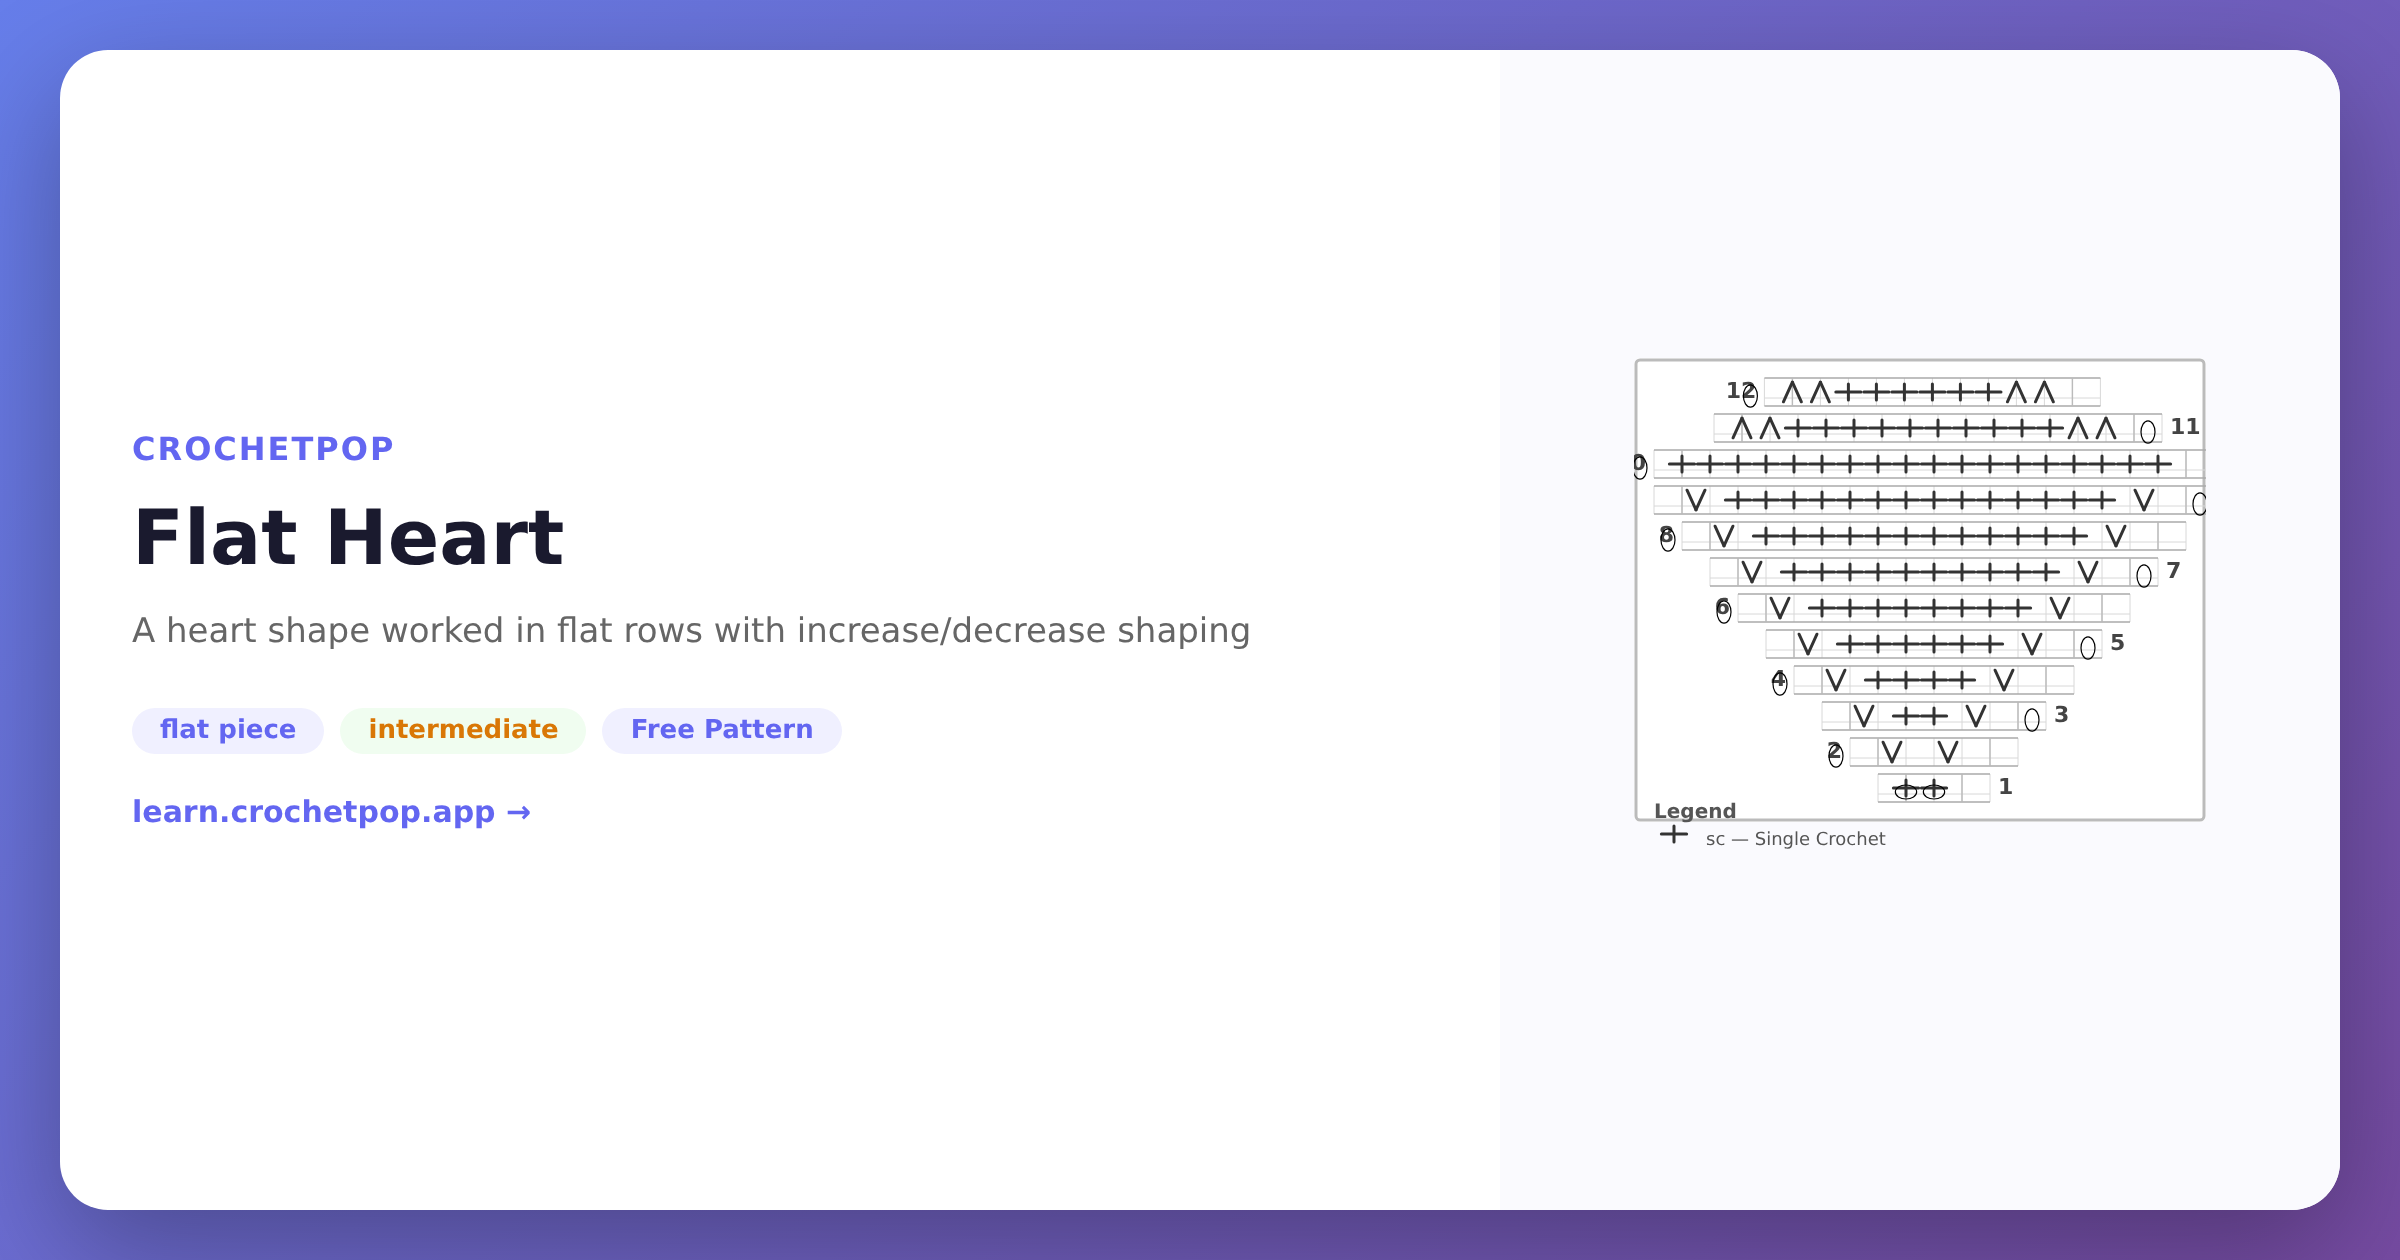
Filet crochet
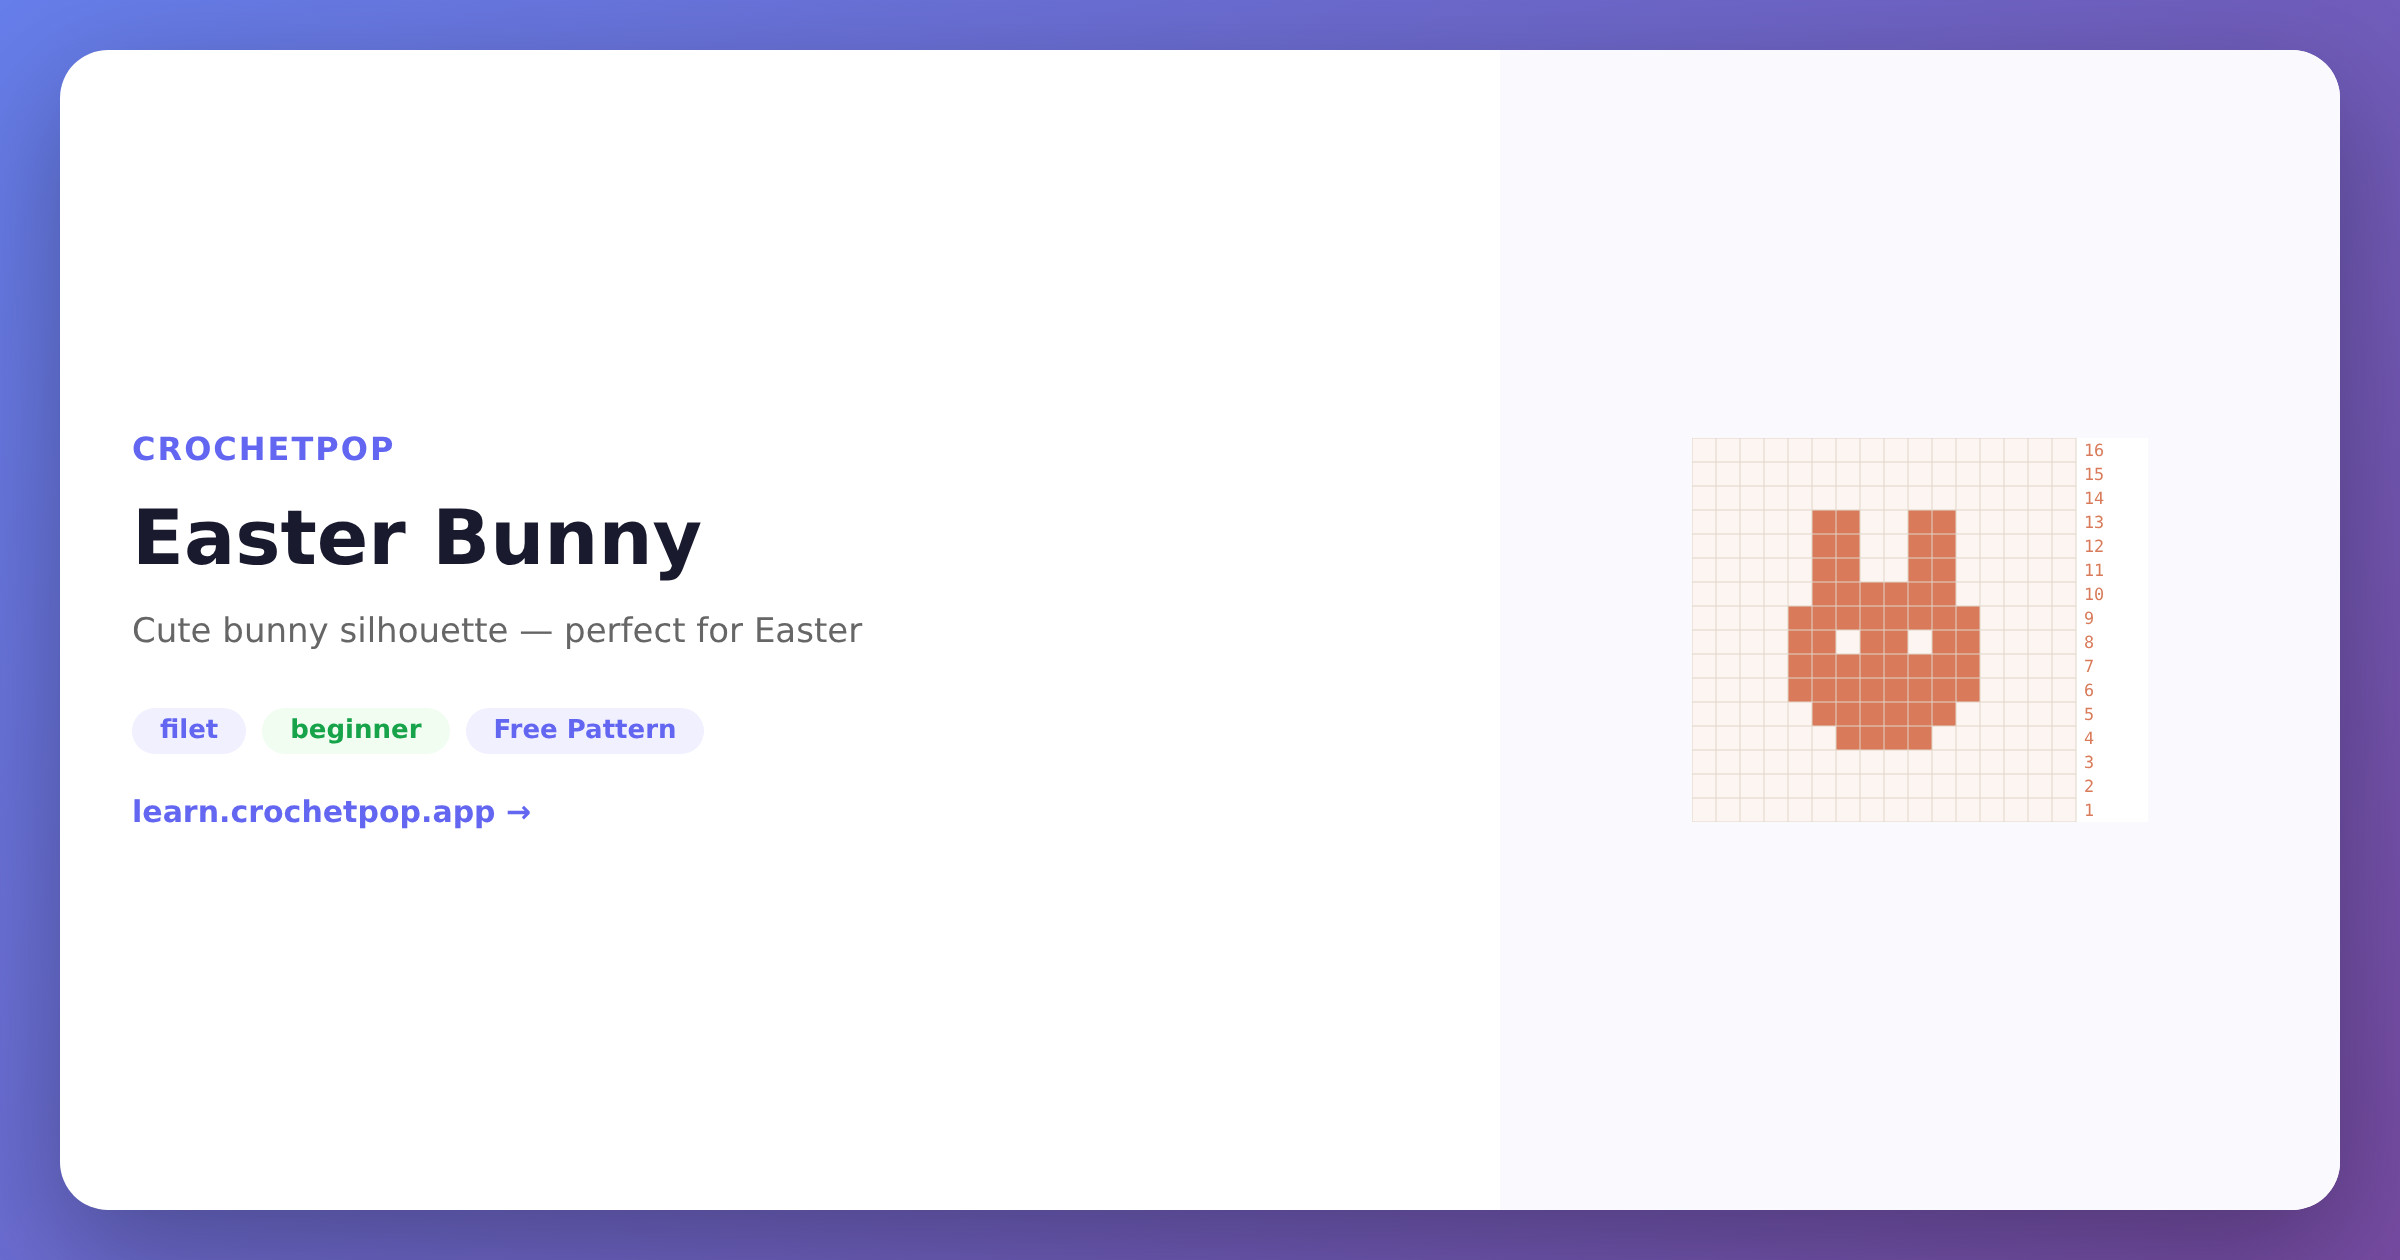
Two-colour technique — every cell is either an "open" mesh (ch 2, skip 2) or a "filled" mesh (3 dc). The result is a lacy fabric that reads as a silhouette: the filled cells form the picture, the open cells form the background. Filet cells are square, even though the underlying stitches are dc. Best for line-art silhouettes: hearts, letters, animals, butterflies.
Difficulty: Intermediate. The stitch is easy (just dc and ch), but reading a filet chart accurately on the first try takes practice.
Best for: 2 colours only, silhouettes, text, curtains, table runners.
Granny pixel
Each cell is one small granny square (a tiny motif worked in the round), and the squares are then joined together to form the full picture. Granny pixel cells are square. The look is more textured and traditional than SC pixel — the colour grid is the same, but the fabric reads as a quilt of small motifs.
Difficulty: Intermediate (you can join-as-you-go to save the assembly step). Faster than SC pixel because each cell is multiple dc rather than one sc.
Best for: 4 to 16 colours, baby blankets, sampler blankets, anything with a deliberately handmade aesthetic.
Mosaic crochet
A two-colour technique where each row uses only one colour, but stitches drop down into stitches from the row two below to reveal the second colour. The result is a strikingly geometric, almost woven look. Mosaic does not handle photos directly — it handles geometric two-colour patterns derived from a photo.
Difficulty: Intermediate to advanced. The technique is not hard, but designing for it requires constraints that beginners often miss.
Best for: 2 colours, geometric reductions of a photo, wall hangings, throws.
Mosaic example image coming soon — we have not yet shipped a ready-made mosaic preview.
Learn mosaic crochet →Step-by-step with CrochetPop
This is the fastest path from "I have a photo" to "I am crocheting row 1" — under five minutes if your photo is well-cropped already, ten if it needs work.
- Open the Design Studio and choose From Image
Go to /design and click the From Image card on the hub page. You will land on the photo uploader. No signup required — everything runs in your browser. - Upload your photo
Drag and drop the image, or tap to select. JPEG, PNG, HEIC, and most common formats work. Files up to about 30 MB are fine — anything larger will be downscaled before processing. - Crop to the subject
Drag the crop handles to frame the subject tightly. On desktop you can also tap the subject to lift it off its background so the palette is spent on the subject, not the backdrop. The crop step is the single biggest predictor of a recognisable finished blanket — give the subject room but cut out distracting background. - Set grid size and colour count
Choose how many cells wide and tall (40 × 40 in SC pixel @ worsted is a small pillow-sized panel — about 10 × 8 inches; 80 × 80 reaches lap-blanket territory at roughly 20 × 16 inches) and how many colours to reduce to. Beginners do best with 4 to 6 colours. The preview updates in real time as you adjust both. - Pick a technique
Choose SC pixel, C2C, filet, granny pixel, or mosaic. If you are not sure, the smart default suggests one based on your colour count and image content — silhouettes route to filet, full-colour portraits route to C2C, and so on. - Fine-tune in the editor
The grid editor opens with your photo turned into a chart. Tap any cell to repaint it. Tap a palette swatch to mark it essential or merge it into a neighbour. This is where you fix the "computer got it wrong" cells before crocheting. - Open the Live Row Tracker
When you are ready to crochet, tap Open Live Row Tracker. The tracker shows the chart at the top, the current row highlighted, and a tap-to-advance counter. Keep your phone on the table next to your yarn — no need to print anything. For the full tour of what the tracker handles (paste-text imports, image-upload imports, per-color yardage, multi-part amigurumi), see the Live Row Tracker post linked in the related guides below. - Save and come back later
Your design auto-saves to your browser as soon as you generate the chart. Close the tab, come back tomorrow, and your work is exactly where you left off. To move between devices, use the Share button to generate a link.
Photo selection — what works and what doesn't
The single biggest factor in a recognisable finished piece is the photo itself. A great photo with a mediocre tool beats a mediocre photo with a great tool every time.
Photos that work
- High contrast between subject and background — a black cat on a white quilt, a red flower against green leaves.
- Centred subject — the subject takes up roughly the middle 60% of the frame.
- Even lighting — diffuse window light or soft overcast outdoor light. Hard sun creates blown-out highlights that don't translate to yarn.
- Recognisable silhouette — if the subject's outline is distinctive (a dog's head shape, a heart, a person's profile), it will read clearly in pixels.
Photos that don't work
- Busy backgrounds — kitchens, parks with bushes, anywhere with more than 5 distinct objects competing for attention.
- Very low resolution — anything under 600 × 600 pixels loses detail when downscaled to a grid.
- Tiny details — eyes the size of 1 pixel on the final grid will look wrong. Faces work best at 30 cells or more tall.
- Heavy filters — Instagram-style filters compress the colour range; the chart ends up muddy.
The squint test: hold the photo at arm's length and squint until it blurs slightly. If you can still see the subject's shape clearly, the chart will work. If the subject vanishes into the background when you squint, the chart will too.
How many colours should you use?
Beginners almost always pick too many colours. Each colour adds yarn ends to weave in, increases the chance of a tension mismatch, and makes the chart harder to read at a glance.
2 to 3 colours
Best for filet, simple silhouettes, mosaic, and high-contrast portraits. The fastest to crochet, the cleanest to finish. A two-colour heart filet curtain takes about 6 hours; a three-colour silhouette portrait runs 15 to 25 hours.
4 to 8 colours
The sweet spot for most pet portraits, recognisable scene blankets, and child's-drawing memorial pieces. You get genuine colour without drowning in yarn ends. Most professional C2C pet blankets sit in this range.
9 to 20 colours
Use this range only if the photo genuinely needs it — a sunset, a stained-glass-style portrait, a complex landscape. Plan to spend an extra 30 to 50% of your project time just weaving ends. Carry colours wherever possible.
CrochetPop's palette merge tool: tap a colour chip in the editor to mark it Essential (keep it in even if it's used in only a few cells) or Merge (collapse it into the nearest neighbour). Use it to drop from 12 colours to 6 without losing the subject.
Roughly how much yarn?
Yardage scales with stitch count, not blanket dimensions in inches. The rule of thumb below is derived from real CrochetPop pattern generators (the actual constants live in the codebase) — accurate enough to buy yarn from, not accurate enough to guarantee you won't need an extra skein.
| SC pixel @ worsted | ~0.033 yards per stitch |
| DC / C2C / filet @ worsted | ~0.055 yards per stitch |
| HDC @ worsted | ~0.044 yards per stitch |
| Granny pixel @ worsted | Between sc and dc — assume ~0.045 yards per stitch |
Total yards = stitch count × per-stitch factor × 1.2 (buffer for tension, ends, swatches).
Example: a 60 × 60 SC pixel blanket = 3,600 sc × 0.033 × 1.2 ≈ 143 yards. A 60 × 60 C2C blanket = 3,600 blocks × ~3 dc × 0.055 × 1.2 ≈ 713 yards split across all colours. Most baby blankets land in the 800 to 1,500 yard range total.
CrochetPop automatically computes per-colour yardage when it generates the chart. The number you see in the pattern document is what you should buy — round up to the next full skein.
Common mistakes to avoid
Six failure modes account for almost every "my photo blanket didn't turn out" story. None are hard to avoid once you know about them.
Picking too many colours
If you can't name every colour you picked out loud ("cream, sand, taupe, light grey…") you have too many. Use the palette merge tool aggressively.
Ignoring stitch aspect ratio
If you generate a chart at 60 × 60 cells but crochet it in dc rather than sc, the finished fabric is 60 wide and ~90 tall — not square. Match your technique to the chart's intended ratio: SC pixel = 1:1, DC = 1.5:1, filet and granny pixel cells = always square.
Forgetting the turning chain
SC turning chain = ch 1 (does not count as a stitch). DC turning chain = ch 3 (counts as the first dc). If you don't account for the dc turning chain you will end up with the wrong stitch count on every row.
Crocheting without a row tracker
Photo charts are not forgiving of "I think I'm on row 27." One mis-counted row in the middle of a face ruins the whole face. Use CrochetPop's free Live Row Tracker (or any tracker) and tap each row as you finish it.
Cropping out the focal point
When you crop tight, double-check that the eyes (for portraits) or the centre of the subject are still in frame. People instinctively crop background out — and accidentally crop the subject's chin off.
Starting Row 1 from the wrong end
Row 1 of any flat foundation works right to left. If your chart labels rows from the bottom and you start from the top, your finished blanket will be mirrored. Read the chart legend before chaining.
Not making a gauge swatch
Crochet a 10-cell × 10-cell test square first in the technique you plan to use. Measure it. If it's not the size you expected, change hook size before you commit to 3,600 stitches.
Skipping the colour test
Real yarn never looks exactly like the hex codes on screen. Buy one skein of each planned colour, lay them together on a table, photograph them in the same light as your reference photo, and confirm the contrast still reads before buying the rest.
Frequently asked questions
Can I really turn any photo into a crochet pattern?
In principle yes — but the result is only as good as the photo. High-contrast subjects with clean backgrounds work brilliantly. Snapshots taken in a cluttered room with low light produce muddy charts. If you wouldn't print the photo and hang it on the wall, the crochet version probably won't sing either.
What photo formats does CrochetPop support?
JPEG, PNG, WebP, HEIC (iPhone), and most common formats. Files up to about 30 MB. The image never leaves your browser — all processing happens client-side.
Is it really free?
Yes. CrochetPop's photo-to-chart, chart editor, and Live Row Tracker are free with no signup. The only paid feature anywhere on the site is custom yarn-kit shipping for users who want us to ship the matching yarn — and that is opt-in, not gated.
Does it work on mobile?
Yes. The whole flow — upload, crop, generate, edit, track — is mobile-first. We test on iOS Safari and Android Chrome on every release. The Live Row Tracker in particular is designed for one-handed phone use while crocheting.
How big should I make my first photo blanket?
Start with 40 × 40 cells. At standard SC pixel worsted gauge (4 stitches per inch wide, 5 rows per inch tall — from CrochetPop's gauge table), that's roughly 10 × 8 inches, which is a pillow-sized panel rather than a lap throw. For a lap-blanket result, try 80 × 80 cells (roughly 20 × 16 inches) or step up to bulky yarn at 40 × 40 cells. Big enough to look intentional, small enough to finish in 10 to 20 hours.
Where can I buy yarn that matches my chart colours?
Any worsted-weight acrylic (Red Heart Super Saver, Caron Simply Soft, Bernat Super Value) gives you 60 to 80 colours to pick from at most craft stores. For higher-end gifts, Cascade 220 wool comes in around 200 colours. We do not sell affiliate links — just buy what your local store stocks.
How long does a photo blanket take to crochet?
Rough rule of thumb at intermediate speed: SC pixel runs ~1 hour per 200 stitches, C2C runs ~1 hour per 100 blocks. So a 60 × 60 SC pixel = 18 hours, a 60 × 60 C2C = 36 hours. Beginners should plan to double those numbers; experienced crocheters can halve them.
What's the best app for tracking my progress?
We are biased — but the CrochetPop Live Row Tracker lives at /track, works offline, syncs your saved designs across devices via a share link, and is free. For a longer breakdown of what it handles — including external-pattern imports, per-color yardage, and multi-part amigurumi — read the dedicated Live Row Tracker post linked in the related guides below. Knitting-focused tools like Knit Companion are excellent if you want a paid option with PDF imports.
Can I export the pattern as a PDF?
Yes. Every generated chart has a Print view that uses your browser's Print to PDF feature. The PDF includes the full chart, a colour legend, written row instructions, and the yardage estimate.
Can I use the same chart for knitting?
SC pixel charts (1:1 cells) translate directly to stockinette knitting charts — the only difference is gauge and the colour-change technique (intarsia for large blocks, fair isle for repeating colours). C2C and filet charts are crochet-only because the underlying construction is unique to crochet.
Related guides
Once you have the photo-to-chart basics down, these guides go deeper into the specific techniques and the long-form theory.
- How to crochet a granny square — basics of motif-based work →
- Filet crochet patterns — the silhouette path →
- Pet blanket technique comparison — SC pixel vs C2C vs granny vs mosaic →
- Best free crochet pattern generators 2026 — full comparison with screenshots →
- Mosaic crochet basics — the two-colour geometric technique →
- Live Row Tracker — track any crochet pattern row by row, in the browser →
Ready to try it on your own photo?
The CrochetPop Design Studio accepts any photo and gives you a chart in under 30 seconds. No signup. Save the result to your browser, open the Live Row Tracker, and start row 1 the same day.